It’s “Tasty Tuesday” and it’s 2 days before Valentines Day so what shall I post…hmmmm….I think I found the perfect recipe just for you!!!!
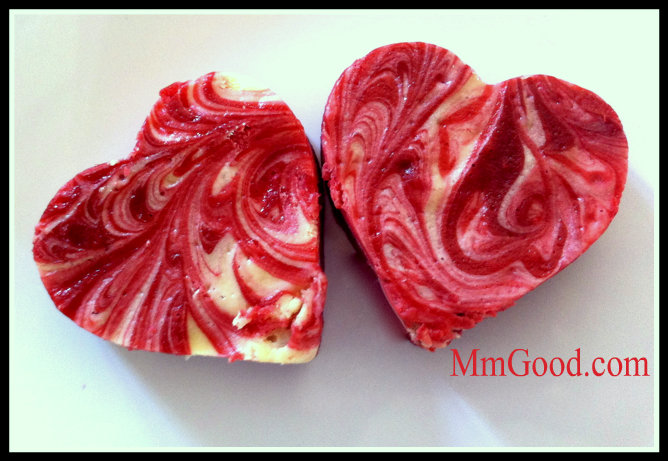
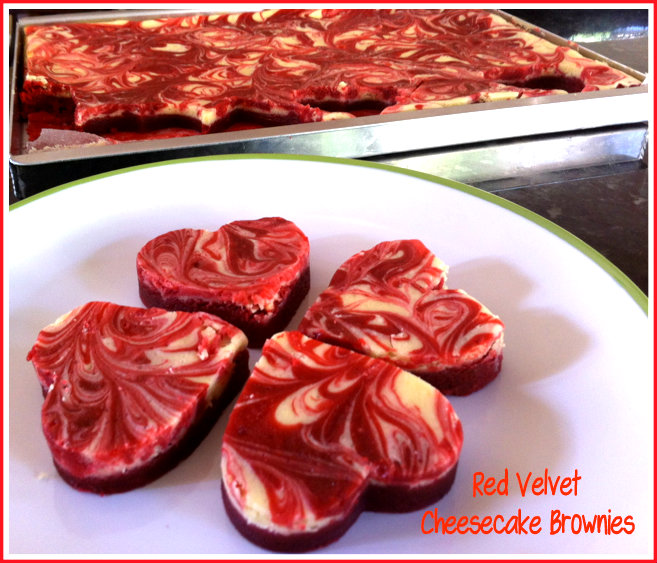
I don’t know about you but I LOVE Red Velvet PERIOD, enough said! While I have yet to find the perfect Red Velvet cake recipe, I did find this recipe for a Red Velvet Cheesecake Brownies and thought “why not?”. I can promise you this, while it appears to have many steps in this recipe for Red Velvet Cheesecake Brownies, it is well worth making them as they are delicious and they look very cute on the table.
You basically make your base recipe which is like a brownie but it’s got food coloring in it to resemble red velvet cake, the brownie bottom is very thick, which is normal so don’t panic. Then your whip up the cream cheese topping and place that on top of your brownie mix, you add in some of the base (that is milked down) in globs and then the fun come in…you take a toothpick or knife and create swirls. I didn’t go too crazy with the swirls as I liked the white to show through. Then you bake it….once it’s all cooled, you use a heart shaped cookie cutter to create your shapes. You can always cut the brownies into bites ized bars and present them that way as well.
If you have a partner that enjoys it when you set the mood for Valentines day, these cut out brownies will help you along the way although you can just cut them in regular brownie sized bars as well and bring them to an event. If you have kids, they will love the swirling part and cutting part so don’t leave them out!
I hope you enjoy this recipe as much as I have.
Thank you for visiting my site. To make sure you are being kept up with all my new posts, please make sure to subscribe in the box listed on the top of the page. You will be emailed with a link to confirm you are interested in the subscription so be sure to click on that link too. Thank you again!
Ingredients
- 3 1/4 cups Flour
- 2 1/4 cups Granulated sugar
- 3 tablespoons Cocoa powder
- 1 teaspoon Salt
- 1/2 teaspoon Baking powder
- 3 large Eggs
- 1 cup Oil, not olive oil
- 4 tablespoons Milk, divided
- 1 tablespoon Vanilla extract
- 1 tablespoon Red food coloring
- 2 teaspoons White vinegar
- 2 8oz packages Cream cheese, softened
- 3/4 cup Granulated sugar
- 2 large Eggs
- 2 teaspoons Vanilla
Directions
- Preheat your oven to 350 degrees. Spray a 13x18 jelly roll pan and set aside.
- In large bowl, whisk together flour, sugar, cocoa powder, salt and baking powder.
- In a medium bowl, whisk together eggs, vegetable oil, 2 tablespoons milk, vanilla extract, red food coloring and white vinegar.
- Combine the dry and wet ingredients until completely combined (your batter will be a really thick it's what you want).
- Remove 3/4 cup of the batter and place it in a medium bowl. Whisk in the remaining 2 tablespoons of milk (into the 3/4 cup of batter you just took out). Set aside the 3/4 cup batter.
- Pour the remaining batter into the prepared jelly roll pan. Using a spatula, smooth out the batter to reach all the edges.
- In your stand mixer, beat cream cheese and sugar until fluffy for about 2 minutes. Add eggs and vanilla, and continue to beat until combined and there are no lumps. Pour the cream cheese mixture on top of the red velvet layer and smooth mixture till it reaches all the edges.
- Drop spoonfuls of the remaining red velvet batter (that you mixed with milk) onto the top of the cheesecake layer. Drag the tip of a knife through the red velvet and the cheesecake layers to create swirls.
- Bake for 28-30 minutes, rotating half way through or until the center is set and it no longer jiggles (you do not want to over bake these).
- Let your brownies cool completely on a wire rack before cutting.
- I used a medium sized heart cookie cutter to create the perfect heart just in time for Valentine's Day treat!